Activated Development:A Map Development StrategyI have "created" (explained) a step-by-step, organized, and practical method for designing maps. Do other people do this already? Probably. Do I follow this method? No, not completely. But, is it ideal? Yes.
---------------
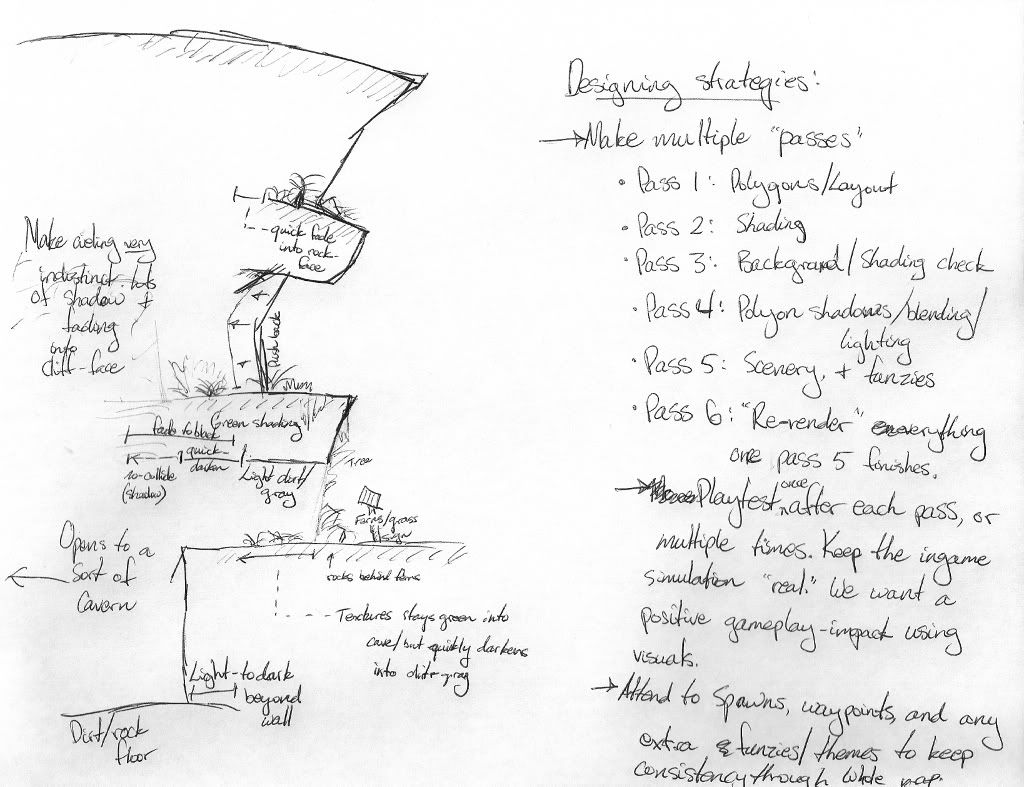
Summary--> Make multiple "passes"
- Pass 1: Assuming you have a plan, design polygons
- Pass 2: Shading
- Pass 3: Create background; update shading accordingly
- Pass 4: Polygon shading/blending; lighting
- Pass 5: Scenery
- Pass 6: "Re-render" everything once you finish "pass 5"
--> Play-test constantly, after every "pass"
--> Attend to spawns, waypoints, themes, and of course, funzies!
---------------
Make Multiple PassesFor those of us who aren't nerds or butchers, the term "pass" or "passes" refers to rendering materials in a 3D program. Rendering simply means to show, display, or furnish. So, a "pass" is rather like a step in the rendering process. The program must follow several steps before it properly displays (renders) a crushed tin can for example. I sometimes tend to think of Soldat mapping as similar to rendering a 3D scene. You, the designer, must "render" each "pass" in order to display a complete, final product.
--> Make multiple "passes"
- Pass 1: Assuming you have a plan, design polygons
In other words, it is highly recommended that you "lay out" your entire map design before you do anything else. After pass 1, I suggest a testing out of your map, the proportions, and maybe add placebo player spawns and waypoints to get a feel for how well bots maneuver the structure of your design. This way, if the design is messed up, changes can be easily made without redoing shading or scenery.
--> Make multiple "passes"
At this point in your designing, it is important, if not already done, to come up with a general theme for the graphics of your map. With a good direction for your map to head graphically the less time you will have to spend fretting about what type of scenery to place. So, shade accordingly.
--> Make multiple "passes"
- Pass 3: Create background; update shading accordingly
If the theme of your maps demands that you have scenery-background - examples being if your map is set in a cavern, hospital, or battlefield - since this scenery is placed
behind all other scenery, it is ideal that you place it now.
--> Make multiple "passes"
- Pass 4: Polygon shading/blending; lighting
At this point, you typically re-shade any polygons to better function with the background scenery you've placed. Personally, I sometimes like to shade particular parts of the map using polygon-shadows, or in other words: all-black polygons that are set to "No collide", and you fiddle with the transparency (opacity) of any given vertex to give the desired effect of a "shadow"
--> Make multiple "passes"
Now for the funzies. You place, all over your map, the themed scenery of your choice to doll up the map and make it unique among the many other maps of Soldat. Often times, scenery will "interact" with the players, an example being bullets that collide into a barrel, or rather the "colliders" you place on the barrel to give the illusion of the barrel being solid.
A discussion on the varying uses of scenery could take up plenty of space, so I will not go into depth about any of the unique ways to go about placing and experimenting with scenery. As an example, Soldat supports gif scenery, but I lack any knowledge as to how to animate scenery. But, if you have any questions, I'd reply.
--> Make multiple "passes"
- Pass 6: "Re-render" everything once you finish "pass 5"
Typically, your map isn't completely polished by this stage. So essentially, by "re-rendering" I simply mean to fix anything that you see needs polishing. This can be a tedious process, but it's typically rewarding in the end, for yourself and others.
Play-test constantlyThis is relatively simple. Simply play your map a lot throughout this whole process! Do you like how it looks, feels, and interacts with you? The focus through all the graphical steps is to create a convincing simulation of a scene that the player is playing in. You want a positive gameplay impact using visuals.
Attend to spawns, waypoints, themes, and of course, funzies!When I say "themes", and example would be having a sign at every spawn point, or random variables (scenery or otherwise) that remind the player that they're playing an almost-arcade INF, HTF, or whatever type of game. The rest is self explanatory. Funzies = Easter eggs
Example of a planned-out section to a map (and my initial thoughts for this topic). Feel free to use the ideas on the left, if you can read the handwriting.
^click^

